In this section we will discuss advanced topics of navigation.
This section describes using navigation with jungigation library. Library is using internally JUNG library for representing navigation graphs. Main target of library is making navigation as simple as possible and powerfull. Note that this library may not compile with the latest Pogamut version and may need some refactoring. Here are advantages:
-
prohibited edges exclusion,
-
advanced planning with items,
-
knowing exact time of path in second.
Main advantage of using jungigation for path planning
is that this path planning uses only paths which has been tryied that
bot can run along them. This "can run" property is tested by BotTester
utility with iexplorer6 bot. It will use some
path executor with some config of steering executors so this navigation
graph generated from map testing will be valid only for this
configuration. Also have on mind that not all vertices of navigation
graph could be reachable by this path planning. For understanding what
it means have a look at next part. If you plan using
AdvancedPathPlanner seriously, you can consider
using AbstractBotWithJungigation class as
superclass for your bot.
Basic idea is to "convert" UT navigation graph to jungigation
navigation graph (graphML file). In jungigation
graphs are saved informations like traveling time between vertices and
items in path. These informations are obtained by running special bot
named iexplorer6 in map. He is
responsible for measuring travel times between vertices. This data
than can be used for path planning. Bot
iexplorer6 uses current set of path executors
so once generated navigation data can became old due to changes in
steering executors. On other side, you can easily generate new one.
Generating navigation graphs for any map can be done by utility called
BotTester. Once you have relevant
navigation file for map, you can use advanced path planning verry
easily.
Here we start with sample navigation bot from NavigationBot tutorial. We will do these steps:
-
include
Jungigationand other necessarily libraries to project -
change
UT2004AStarPathPlannerpath planner toAdvancedPathPlanner -
Use advantages of AdvancedPathPlanner
Including Jungigation library is simple. Just right click on project, secelct properties, than choose libraries. There click on add Jar/Folder button and navigate to downloaded Jungigation library file. Than click ok. It's done. Library file could be downloaded from jungigation download page. Other needed libraries are avaible on JUNG homepage.
To change UT2004AStarPathPlanner planner, you need to change type of
pathPlanner attribute. You should change it from
PathPlanner<;ILocated, ILocated>; to AdvancedPathPlanner. This
change is around line 50. This will cause problem on line 77, where
you should write consecutive code instead of pathPlanner = new
UT2004AStarPathPlanner(bot);.
Collection<;NavPoint>; navpoints;
String mapName = this.gameInfo.getLevel();
navpoints = this.bot.getWorldView().getAll(NavPoint.class).values();
Graph<;MyVertice, MyEdge>; navigationGraph;
navigationGraph = NavigationGraphProviderForMap.getInstance().getNavigationDataForMapWithChceckAndInitialization(mapName, navpoints);
pathPlanner = new AdvancedPathPlanner(navigationGraph, bot, navpoints);
pathPlanner.setActiveProfile(AdvancedPathPlanner.ARMORINTEREST);
NavigationGraphProviderForMap is responsible for managing graphML navigation graphs for user. It assumes that all graphML files for maps are in root directory of project. It will try to acces them in "./" path. To change this assumption, use NavigationGraphProviderForMap constructor for creating navigation graph provider which is reading data from other source and than request navigation graphs from this instance. Some precomputed graphML files (navigation graphs) are avaible on Jungigation download page.
To use advanced path planning just plan path normally.
AdvancedPathPlanner has set its planning
alghoritm to some value and it is used. To use different planning
profile (policy) just call pathPlanner.setActiveProfile("new
profile");. From that point the bot will use new path planning
alghoritm constants to plan path. There are also simple version of
jungigation path planning classes like
PathPlannerTimeOptimized or
PathPlannerForDataAcquisition. See javadoc for
particular class for more info.
Simple but sometimes usefull visualization can be done through simple jung visualization program. For generic visualization you can use any program capable of reading graphML graph. For example you can try yEd. In this section will be described simple utility for visualizating jung navigation graphs. Described utility is prototype version of visualizing utility.
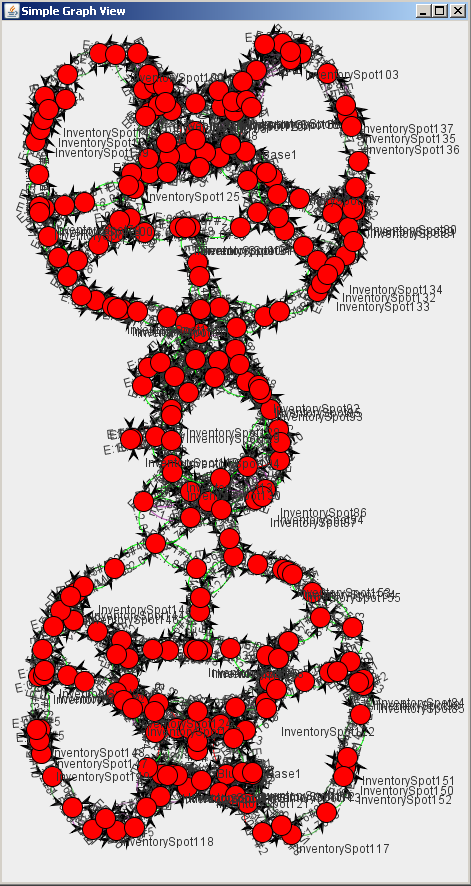
First start Jungigation library as java application. It will open simple window. Choose File->;Open, or use shortcut ctrl+o. Select desired graphML file and it will open new window in which will be loaded navigation graph. Graph is rendered in 2D, so multifloor levels will look strange. For example map CTF-LostFaith will look something like on next picture.
You can navigate in graph by mouse. Zooming is done by mouse wheel and panning is done by leftclick. You can also try to compute path between two vertices. Just select "from" vertice and than select "to" vertice while holding down shift key. It will highlight shortest path based on travel time. To look closer on sensus of visualized graph, have a look on next screenshoot.
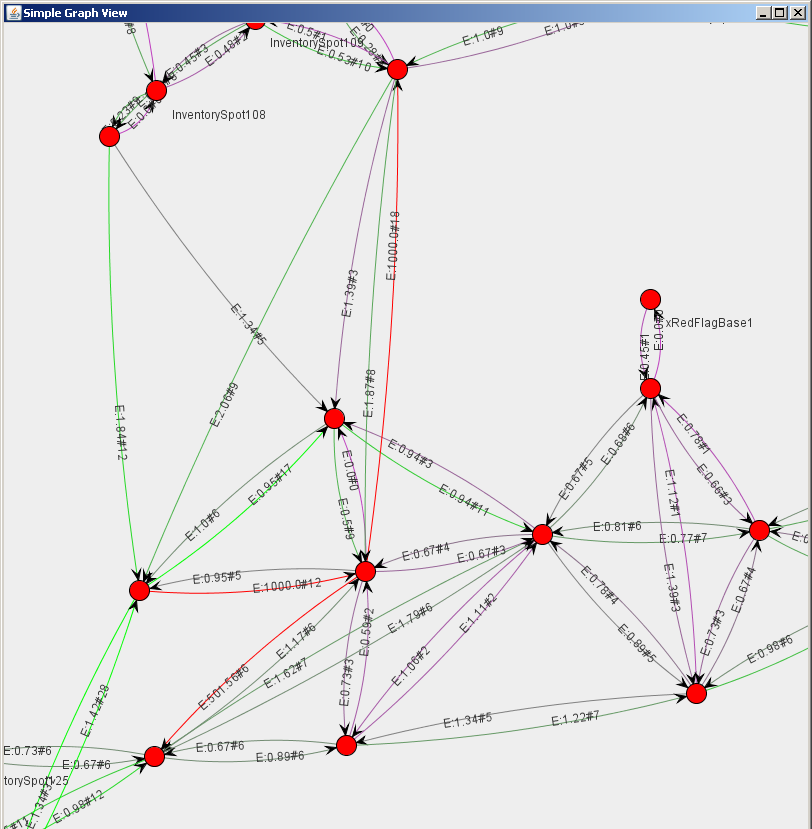
On zoomed graph you can see that edges are colored in some pattern. Red edge is "prohibited" edge. That is edge with travel time grater than 100. All tryies to travel some edge that finished in stucked state are given travel time 1000 seconds. Final travel time is always counted as median of all travel times. Green edges are edges with normal (lees than 100) median travel time. Purple edges are also edges with normal travel time, but number of traveling thru that edge is lees than 15 times. On next screenshoot we will discuss meaning of edge labels.
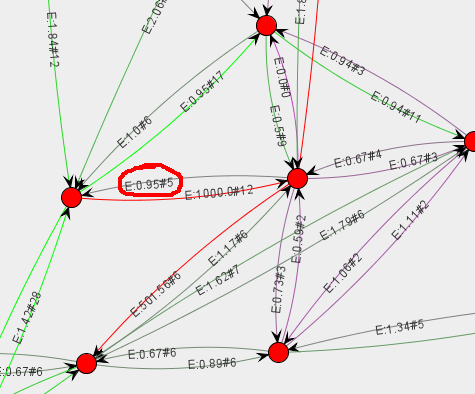
Here is some detail of navigation map. Look at rounded edge label. It is "E:0.95#5". This means that median travel time is 0.95 seconds and this is computed from five observations. That means that Iexplorer6 bot travelled through that edge five times. To view particular travel times you need to have a look at original file, or to use some other visualization method.
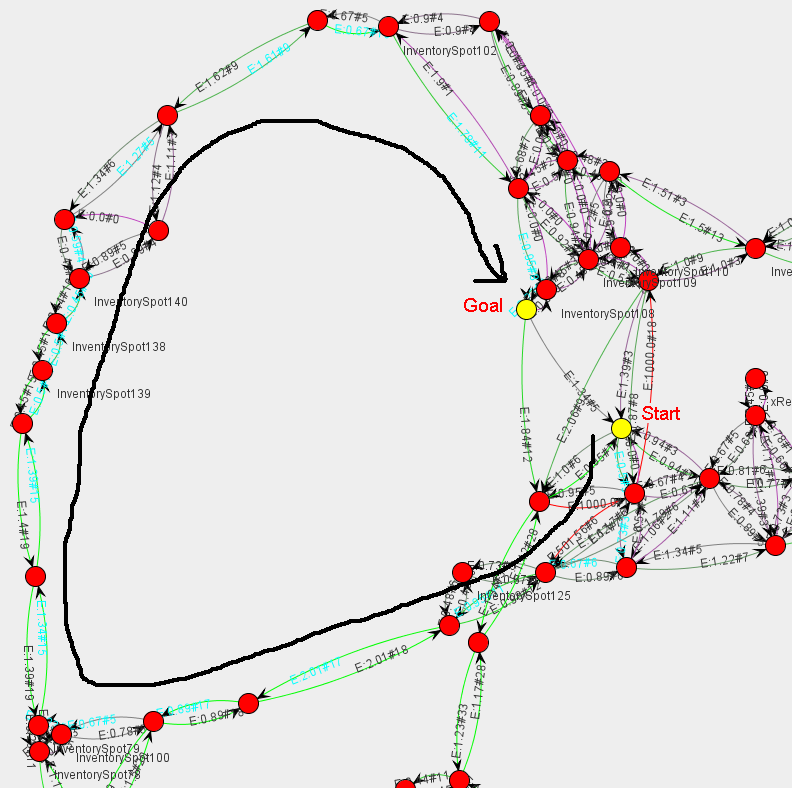
To show sample path planning with time based planer, just select two vertices. First is start vertice and second will be goal vertice. Path will be highlighted as on next screenshoot.