This tutorial can be applied to PogamutUT2004 and will mostly hold in PogamutUDK examples.
So far the examples were very basic, now we are getting to the first real topic - the movement. This example bot shows how to deal with goal of getting from place A to place B. First we will describe space representation used by Unreal Tournament and Pogamut, then we will show Pogamut objects facilitating the path planning and execution of precomputed path.
This example is installed by Pogamut UT2004 installer. In NetBeans click New Project -> Maven -> Project From Archetype -> Local Archetypes Catalog and select 02-navigation-bot-archetype project. Moreover, as Pogamut 3 has been fully mavenized, you can try and run this example even without installing the Pogamut NetBeans plugin. However in that case you won't be able to use visualization as this is a part of Pogamut NetBeans plugin. To open up this example in NetBeans follow up the steps in Opening Pogamut Examples chapter. This archetype information is below.
For UT2004 example:
-
cz.cuni.amis.pogamut.ut2004.examples
-
02-navigation-bot-archetype
-
3.3.1
-
http://diana.ms.mff.cuni.cz:8081/artifactory/repo
For UDK example only change to cz.cuni.amis.pogamut.udk.examples and 3.2.5-SNAPSHOT . The rest remains the same.
You will find up-to-date list of available archetypes in Pogamut Maven archetypes catalog
Navigation graph is basic space representation used for
navigation. The map is covered by nodes called navigation
points , in short navpoints . Each
navpoint is located in some safe location that can be reached by the
bot. When there exists direct path from one navpoint to another then
they are connected with an edge. With this representation finding a path
from navpoint A to navpoint B can be easily solved with any graph search
algorithm, particularly popular is heuristic A* algorithm (pronounced "A
star"). Output of the path planning algorithm is sequence of nodes that
should be followed in order to get to the target location.
To make it all more complicated, sometimes it is not enough to only travel along the edge between navpoint A and navpoint B to reach the target location. Sometimes the bot needs to perform something extra to reach the target, e.g. using a lift or jumping over some hole in the ground. For these reasons UT2004 introduces several types of navpoints and edges that hold information about what is needed to be done in order to travel along the edges and navpoints. Most common navpoints:
-
Most common navpoint. Used to mark some safe area where the bot can move. Usually, there is nothing special.
-
Same as above, except the players and bots can be respawned here by the game.
-
Here an item will be respawned regulary.
-
This point is attached to a moving lift. It will move with the lift (so the location of this navpoint IS NOT static)!
-
Marks the navpoint connected to LiftCenter with an edge.
-
This point means that the bot will need to jump to or from this point. Also can mark Jump Pads - special points that makes the bot to jump high.
-
There is a teleporter on this point that will teleport the bot to another place in the map.
Most common edges:
-
Basic type of node. If no further information is given (by associated navpoints) it means that simple walking will get the bot through this edge.
-
To traverse this edge the bot will need to make a simple jump along the way. Double Jumps or more complex jumping behavior is usually handled by other attributes.
-
This edge leads to a door. There are not many doors in UT2004.
-
This ledge marks a ladder.
-
This is a special type of edge - you should check other attributes of the edge and navpoints.
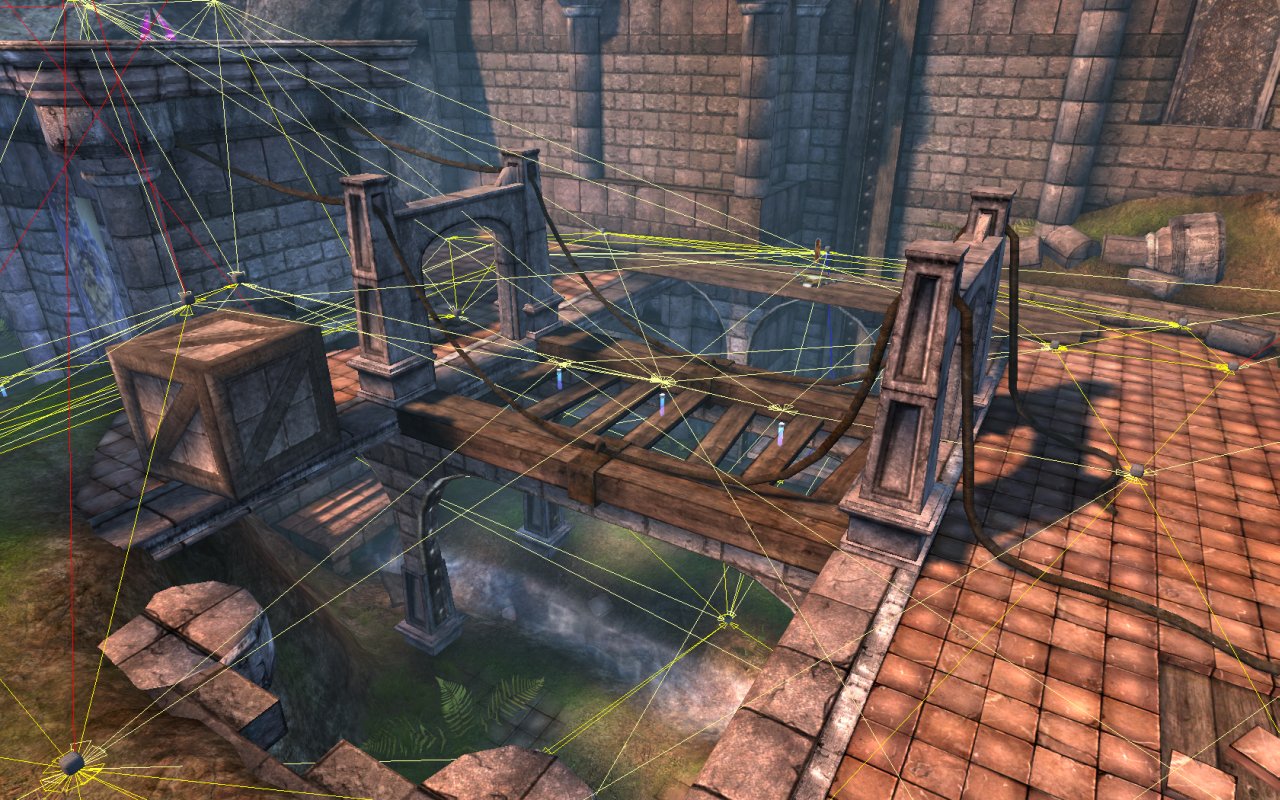
The navpoints and edges can be visualized in the game by pressing CTRL + G. Below you see part of the navigation graph with edges on the map DM-1on1-Albatross.
In First Person Shooter games most (or all) of the time is spent by moving - getting from point A to point B to pick up better weapon, running to medkit to heal or dodging incoming rockets or projectiles. This means that if your bot won't be able to move very well, it won't be perceived as very good or human-like. So how easy is to make the bot to move across the map flawlessly? The answer is not very easy... Navigation in the environment is a complex task that can be divided into two major parts with none of them particularly simple:
-
Plan path between start location and the destination
-
Follow this path planned path
Why isn't the path planning simple? We have this navigation graph available with edges, so finding a path from point A to point B is a simple A*! Well, yes. But consider for example you want to plan a path that will AVOID enemy player or certain areas in the map or won't be the shortest but the safests. Everything gets immediately more complex and standard algorithms may not be enough to solve the tasks.
Why isn't the path following simple? We already know that there are special types of edges and navpoints present in the environment. In order to traverse some of these edges we need to implement a certain type of logic to make it work. For example to go up with the lift, we need to check if the lift is actually at our floor, that it is not moving and we can board it, then when we are on the lift, we need to check when it is the right time to exit the lift, etc. The things get even more complicated when the frequency of updates from the environment is scarce. You may miss the ideal point to perform a jump to get over the hole or to get on the lift. To implement robust path following mechanism you need to take care of all of these things, which means a lot of parametrization and a lot of testing.
Next we will speak about the navigation implemented in Pogamut. We will start from simple examples and slowly move deeper into Pogamut navigation modules.
Pogamut navigation consists of several modules each handling one type of navigation problem (e.g. path planning, path following, etc.). The main wrapper of everything is
UT2004Navigation accessible from the bot code by typing navigation. and its use is very simple. In order to move the bot to desired place
utilizing all the information from navigation graph, only thing you need to do is to call once (or even regularly) navigation.navigate(ILocated location), e.g.
    public void logic() {
        if (players.canSeePlayers()) {
            if (!navigation.isNavigating())
                navigation.navigate(players.getNearestVisiblePlayer());
        }
    }
The navigation module will take care about everything. It will find the path using the navigation graph to the destination and it will move the bot along the points in the path until
it will reach target destination. There is even some anti-stuck behavior implemented and a listener that may be registered to listen to various events of UT2004Navigation such as
have we already reached the destination? Input to navigation.navigate(ILocated location) may be everything that implements interface ILocated.
So we know how to make the bot to move to a place using the navigation graph, but what is the best way to find out we have reached the destination? We could always check this regularly in
the logic() method, but there is simpler way utilizing FlagListener<NavigationState> listener. By registering this listener, you will be notified about the
current state of UT2004Navigation module and you will be able to react to its events, see below:
    public void botInitialized(GameInfo gameInfo, ConfigChange config, InitedMessage init) {
        navigation.addStrongNavigationListener(new FlagListener<NavigationState>() {
            @Override
            public void flagChanged(NavigationState state) {
                switch (state) {
                    case PATH_COMPUTATION_FAILED:
                        //something went terribly wrong - there is no path to target destination
                        //or another critical problem, we should replan to another destination
                        tabooNavPoints.add(targetNavPoint, 180);
                        break;
                    case TARGET_REACHED:
                        //we have successfuly reached target destination
                        break;
                    case STUCK:
                        //the bot has stuck! ... seems that target nav point is unavailable currently
                        //we have fallen down into some hole or got stuck at some ledge, we should
                        //replan or try to solve the situation manually
                        break;
                    case STOPPED:
                        //path execution has stopped, was probably turned off by the user from the bot code
                        break;
                }
            }
        });
	}
This was the basic overview of Pogamut path finding and path following funcionality. In the next sections we will go through Pogamut navigation modules in a greater detail.
Pogamut navigation in the level is divided into two stages:
-
Plan path between the bot location and the destination
-
Follow this path
Path planner is object responsible for the first stage of this
process. Pogamut comes with several implementations of
PathPlanner interface, the default is
FloydWarshallPathPlanner, this class precomputes
all paths between all navpoints at the startup which may take some time
(the algorithm runs in O(n^3)).
Another planner implementation is
UT2004AStarPathPlanner. UT2004AStarPathPlanner is a
proxy object that provides functionality of Unreal Tournament internal
A*, this means that your bot can use exactly the same path planning
algorithm as native UT bots.
The planner is by default automatically instanciated in
UT2004BotModuleController. You can create your own
instance manually:
        // create new UT path planner
        UT2004AStarPathPlanner utPathPlanner  = new UT2004AStarPathPlanner(bot);
        // create new FloyadWarshall path planner
        FloydWarshallPathPlanner fwPathPlanner = new FloydWarshallPathPlanner(bot);
UT2004AStarPathPlanner or FloydWarshallPathPlanner
constructors require reference
to the bot because it sends some commands to the game
engine using the IAct and receives response
through IWorldView events. If you want your bot
to use different path planning strategy just code your own
PathPlanner implementation.
Path executor handles navigating along the given path. It consists
of the path navigator (interface IUT2004PathNavigator) that handles the actual navigation along the path
and the code that handles for example waiting for the path be be complete
(sometimes it takes time before the whole path is computed). Default path
executor is UT2004PathExecutor. To implement your
own path executor you have to implement PathExecutor
class. However in most cases when you want to change the way how the bot navigates
through the environment it will be enough to write your own path navigator
(this is also recommended way). More about path navigator below. Path executor
is instanciated automatically in UT2004BotModuleController
class.
Path navigator is an interface responsible for moving the bot along precomputed
path, avoid obstacles, open doors, wait for lifts, jump over pits etc. The default
implementation of IUT2004PathNavigator interface is
LoqueNavigator . Again as in the case of
PathPlanner you can provide your own
implementation of this interface, for example you can implement new path
navigator that will enable the bot to avoid incoming rockets while moving
to the target.
Path executor and path navigator are strong tools, but for the starting user they may
seem complicated at start. Moreover, those objects are not able to handle more complicated
path finding fails such as wrong edge in navigation graph.
To facilitate this, we have created a navigation facade called
UT2004Navigation. This class wraps all access to bot navigation code.
When using this, the user may forget about path planning and path following if he wants to.
UT2004Navigation provides method navigate(ILocated target)
that can be called both synchronously or asynchronously. It may even be called repeatably from logic() method without
fear of requesting the same path twice in a row as UT2004Navigation takes care of it.
UT2004Navigation provides the same set of events as path executor -
so the user is able to handle special cases as stucking etc.
Now how it works in our example bot. The API that is most important
for bot programmer are navigation.navigate(...) and
navigation.addStrongNavigationListener(PathExecutorListener) methods
of UT2004Navigation (listener is forwarded from PathExecutor). The
navigation.navigate(...) method makes the bot follow
path computed by some PathPlanner,
handleNavPointNavigation() shows example usage of
this method:
    private void handleNavPointNavigation() {
        if (navigation.isNavigating()) {
            // WE'RE NAVIGATING TO SOME NAVPOINT
            logNavigation();
            return;
        }

        config.setName("NavigationBot [NAVPOINT]");

        // NAVIGATION HAS STOPPED ...
        // => we need to choose another navpoint to navigate to
        // => possibly follow some players ...

        targetNavPoint = getRandomNavPoint();
        if (targetNavPoint == null) {
            log.severe("COULD NOT CHOOSE ANY NAVIGATION POINT TO RUN TO!!!");
            if (world.getAll(NavPoint.class).size() == 0) {
                log.severe("world.getAll(NavPoint.class).size() == 0, there are no navigation ponits to choose from! Is exporting of nav points enabled in GameBots2004.ini inside UT2004?");
            }
            config.setName("NavigationBot [CRASHED]");
            return;
        }

        talking = 0;

        navigation.navigate(targetNavPoint);
        logNavigation();
    }
Method handleNavPointNavigation() is called every logic iteration. When the navigation is running
(determined by navigation.isNavigating()) we simply escape the method, since the bot is currently moving somewhere.
Otherwise we randomly pick new navigation point with getRandomNavPoint() and call navigation.navigate(targetNavPoint).
Once the navigation.navigate(...) method is called
the bot starts moving towards desired navpoint. To get notified about
path execution status we have to register listener on path
executor:
        // IMPORTANT
        // adds a listener to the path executor for its state changes, it will allow you to
        // react on stuff like "PATH TARGET REACHED" or "BOT STUCK"
        pathExecutor.getState().addStrongListener(new FlagListener<IPathExecutorState>() {

            @Override
            public void flagChanged(IPathExecutorState changedValue) {
                pathExecutorStateChange(changedValue.getState());
            }
        });
    /**
     * Path executor has changed its state (note that {@link UT2004BotModuleController#getPathExecutor()}
     * is internally used by
     * {@link UT2004BotModuleController#getNavigation()} as well!).
     *
     * @param state
     */
    protected void pathExecutorStateChange(PathExecutorState state) {
        switch (state) {
            case PATH_COMPUTATION_FAILED:
                // if path computation fails to whatever reason, just try another navpoint
                // taboo bad navpoint for 3 minutes
                tabooNavPoints.add(targetNavPoint, 180);
                break;

            case TARGET_REACHED:
                // taboo reached navpoint for 3 minutes
                tabooNavPoints.add(targetNavPoint, 180);
                break;

            case STUCK:
                // the bot has stuck! ... target nav point is unavailable currently
                tabooNavPoints.add(targetNavPoint, 60);
                break;

            case STOPPED:
                // path execution has stopped
                targetNavPoint = null;
                break;
        }
    }
Also note stuck detectors - simple modules that can be registred in
path executor or navigation. These modules are automatically initialized for you in UT2004BotModuleController.
These modules signalize when the bot gets stuck. STUCK event will
be generated that can be reacted to in FlagListener. Default modules are:
            pathExecutor.addStuckDetector(new UT2004TimeStuckDetector(bot, 3.0));       // if the bot does not move for 3 seconds, considered that it is stuck
        pathExecutor.addStuckDetector(new UT2004PositionHistoryStuckDetector(bot)); // watch over the position history of the bot, if the bot does not move sufficiently enough, consider that it is stuck
Each time target location is reached this
FlagListener<IPathExecutorState> implementation will make the
bot to add current targeted navigation point to bot taboo list (tabooNavPoints) - a list of navigation points he will not consider for some time.
As the navigation will stop when the bot is stucked, next time the bot chooses navigation point he will not consider this
newly tabooized point.
For debugging it is often useful to see the navigation graph the bot is following. You can visualize the graph in Unreal Tournament itself or in the Netbeans plugin. We will describe both possibilities.
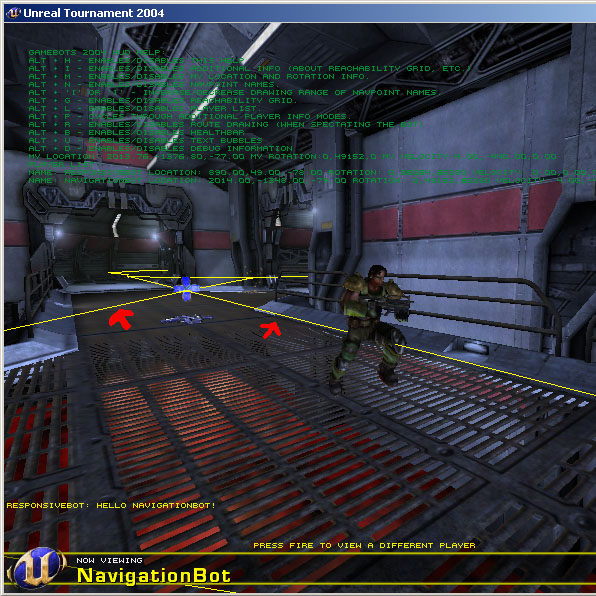
If you are in UT you can easily show the graph by pressing CTRL + G . This will add the navigation graph to the rendered image. After pressing this combination you will see graph with set of edges also rendered in the image. Notice that the edges have arrows indicating their orientation. Some edges are only one way, e.g. you can jump down through the window but you cannot get to the second floor by jumping from ground to the window. Another handy shortcut is CTRL + R, this will draw a red line showing bots planned path. However, CTRL + R will only work if you set the nodes for visualization manually from the bot code by the SetRoute command.
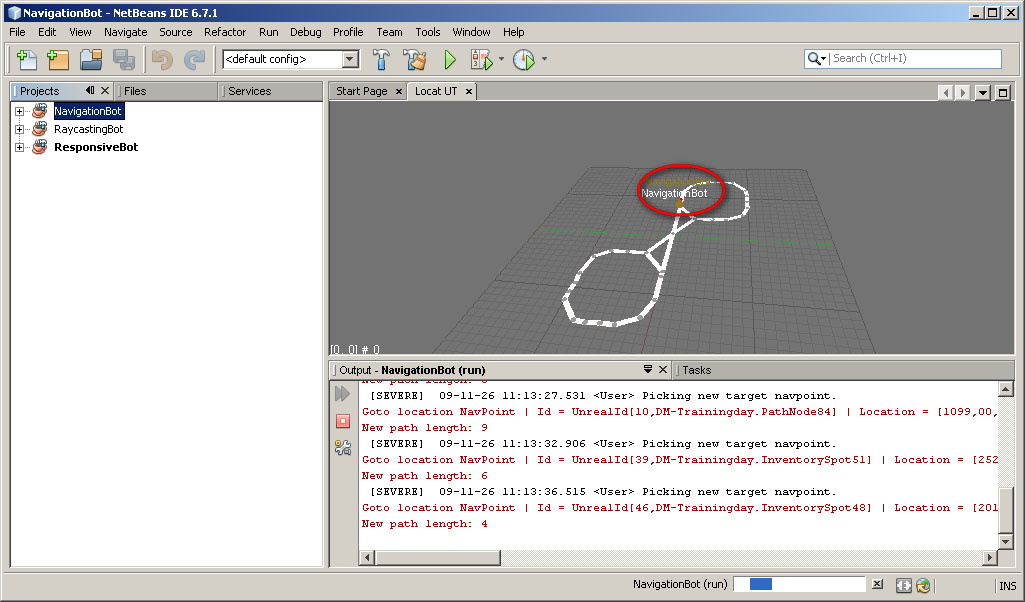
Second option how to visualize the navigation graph is to show the whole level in map viewer build in the Netbeans plugin. To show this map double click UT server node.
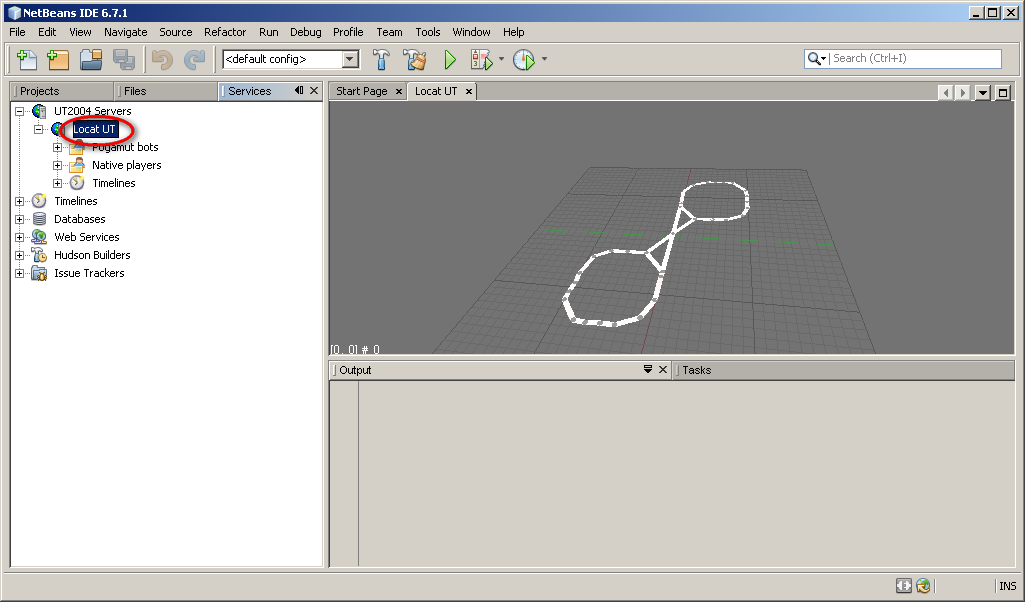
As you can see the view shows only navigation graph and your connected bot.
Controlling the map:
-
Hold LEFT MOUSE button and move the MOUSE to rotate the map.
-
Scroll the MOUSE WHEEL OR hold ALT button and move the MOUSE up and down to zoom in and out.
-
Hold LEFT and RIGHT MOUSE button and move the MOUSE up and down to shift the view on the map up and down.
-
Hold RIGHT MOUSE button and move the MOUSE to shift the view on the map to sides.
The geometry of the level itself is not shown. The map is most useful when debugging team strategy.
To add a new bot: right-click on NavigationBot ("Projects" tab) and press "Run" (or "Debug").
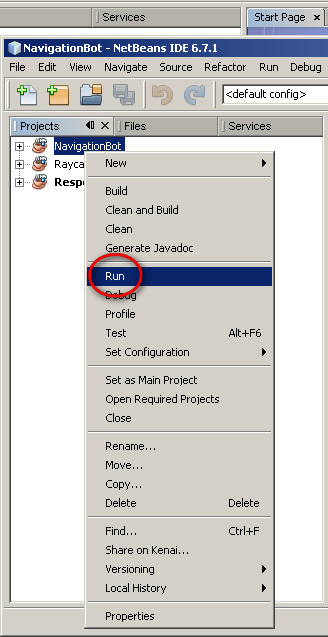
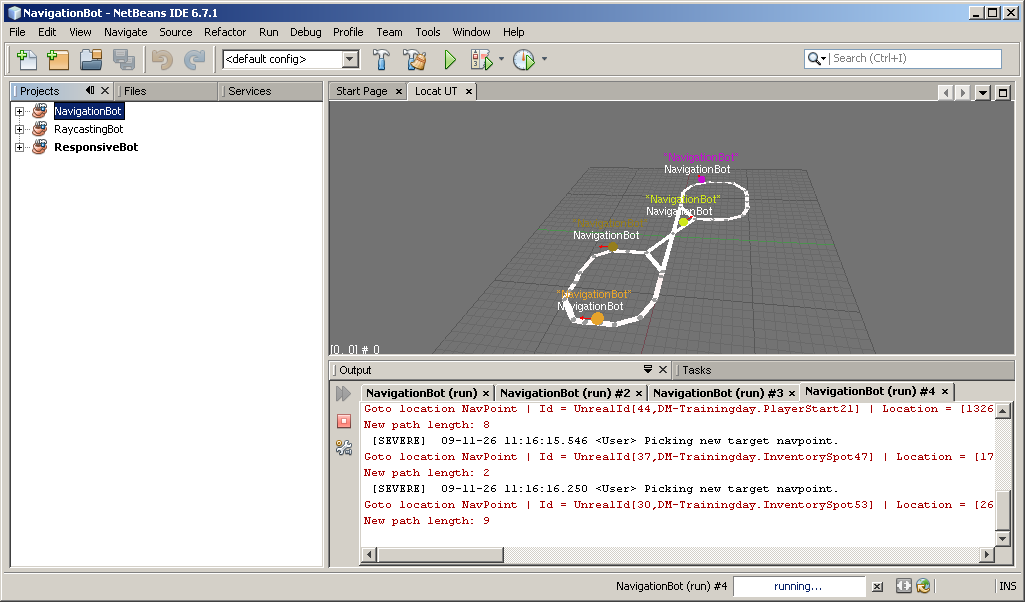
Added bot will appear on your map as another dot. You can add as many bots as you want.
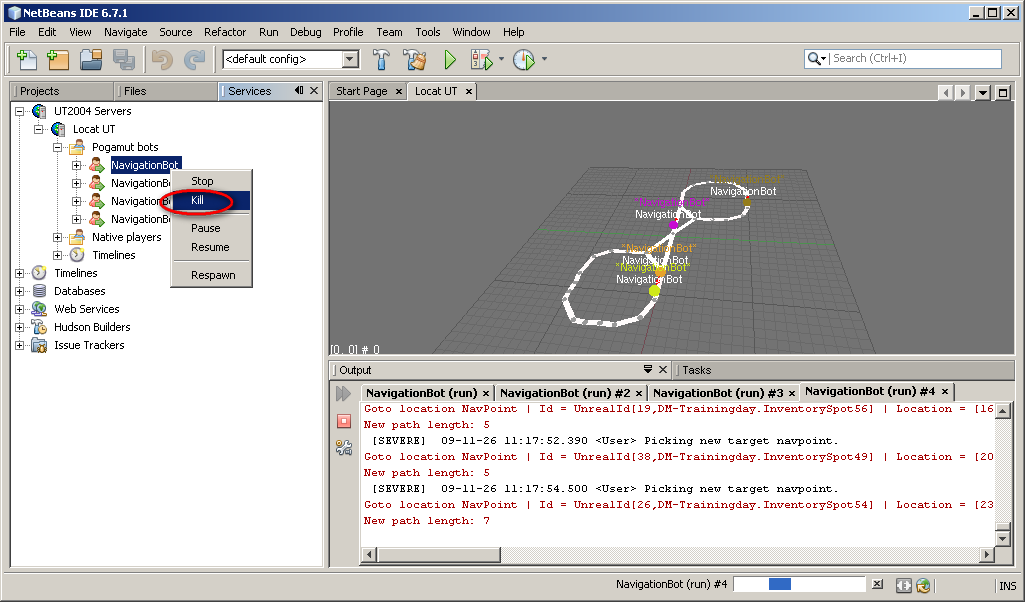
And to remove bot go to Local UT (server node), Pogamut bots and here right-click on some of those and press "Kill".